
The terms used in shuttle tatting are shared by needle tatting. However, the movements used in needle tatting are different from the movements used in shuttle tatting. In needle tatting, the double stitch is placed directly on the needle and is not flipped. In shuttle tatting, the core thread is used to flip the ball thread to make the double stitch. In either case, the finished look of the double stitch, essentially, looks the same.
There are two sections to this page: Needle Tatting and Shuttle Tatting. Each section lists (in alphabetical order) the definition of common terms used in tatting.
Ball Thread (BT): Uncut thread originating from the ball of thread.
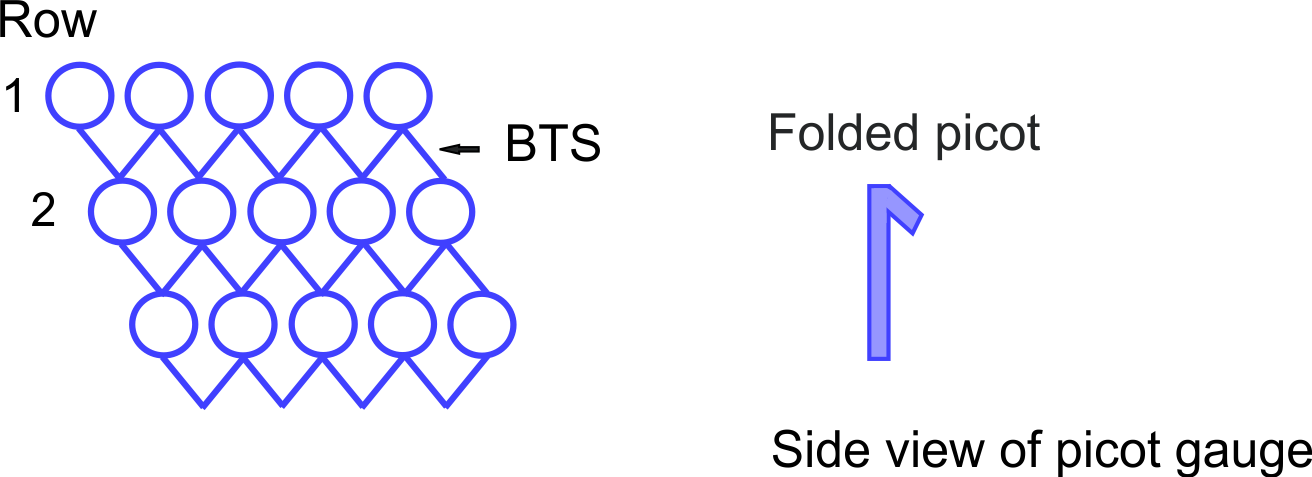
Bare Thread Space (BTS): The core thread has an unworked section of thread. For example, 1/4″ of BTS occurs when there are no double stitches covering 1/4″ of the core thread. Bare thread spaces are used in mignonette (see example below), half-closed rings, and for other decorative purposes.
Blocking: After tatting your article, make sure it is flat and clean. Wash the tatted article in a mild soap and warm water. If your water supply has an abundance of minerals, use distilled water. Then, with rust-proof pins, pin lace out on a pinning board. I like to use T-pins to open up the picots.
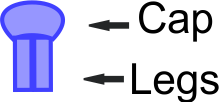
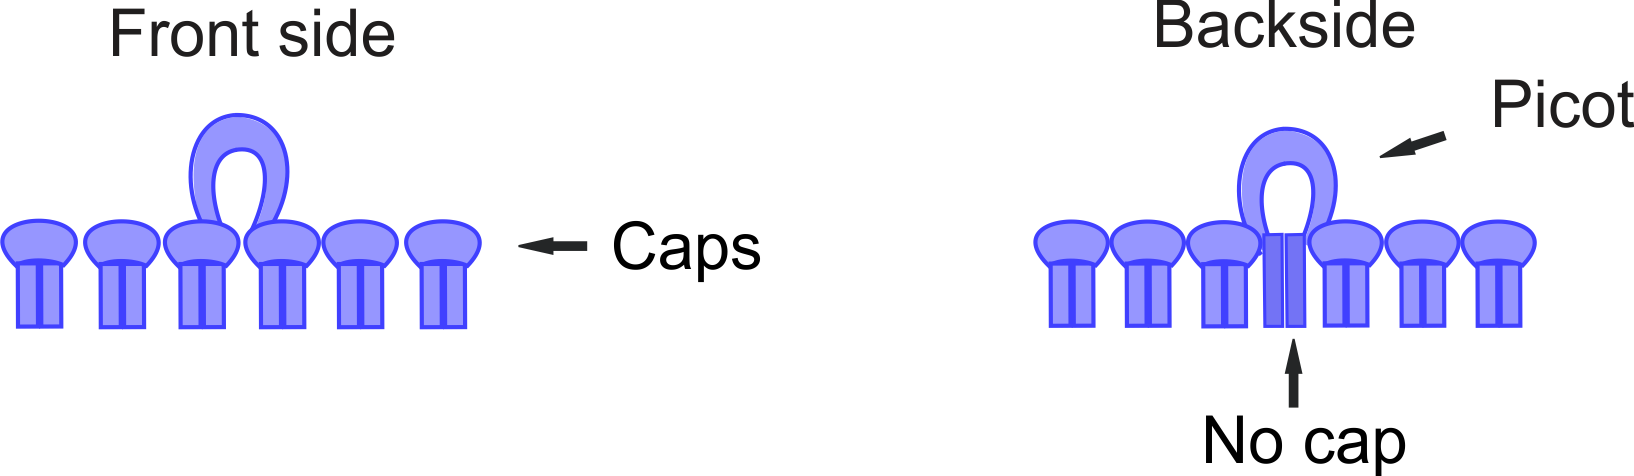
Cap: A cap is the bump above the legs of a double stitch. It is an easy term to remember as most people wear a cap on their head which is above their legs.
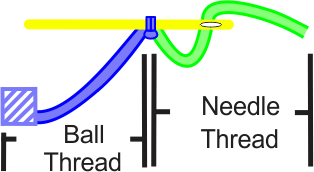
Chain (Ch): A chain is made with two threads: a ball thread and a needle thread. The needle thread acts like a clothesline upon which the double stitch hangs.
Close (Cl): In needle tatting, all rings and chains are closed. This motion is also called the shoelace trick. The shoelace trick uses the same first motion used when tying your shoelaces. Cross needle thread over the ball thread by turning your work to its opposite side. An almond shape forms. With the needle thread on top, insert needle under the ball thread, through the center of the almond, then over the needle thread. Tighten this half knot.
Clover: Clovers are composed of three consecutive rings grouped together. The center ring may be larger than the side rings. This is similar to a trefoil. However, the rings in a trefoil are uniform in size.
Continuous Thread Method (CTM): Most often this refers to a strategy to move from one element (such as a ring or a chain) to the next without cutting and tying threads. Split rings, split rings, and mock picots are common CTM techniques. Also, this technique is known as the knotless method.
Core Thread: a.k.a. foundation thread, needle thread, or running thread. Traditionally, the needle thread is used as the core thread. It is like a clothesline upon which the double stitch hangs.

Double Stitch (DS): This stitch is the basis of tatting. A DS is actually a lark’s head knot.
First Half Stitch
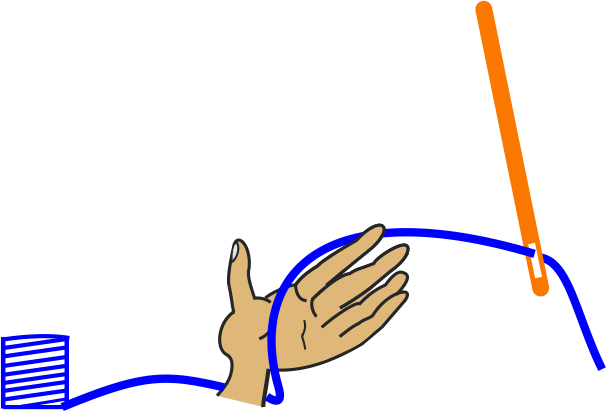
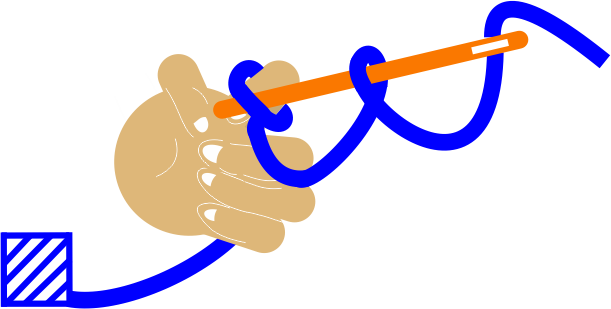
Lay thread over palm of hand. Grasp thread with last three fingers.
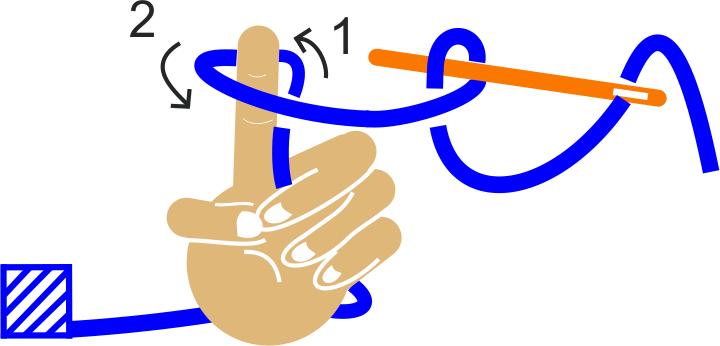
Point index finger towards the sky.
Wrap thread clockwise around index finger.

Insert needle beneath bottom thread. Lift off finger.
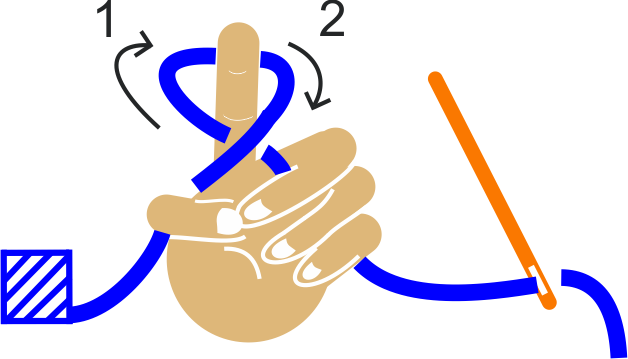
Second Half Stitch
Wrap thread counterclockwise.

Bend index finger.
Insert needle. Withdraw finger. Lift off thread.
Completed double stitch.
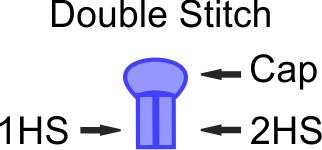
First Half Stitch (1HS): This is the first leg of a double stitch. Wrap ball thread in a clockwise direction to make this stitch. Lift off of your index finger in the usual way.
Front side/backside: Each double stitch has a cap. In front side tatting, all of the caps can be seen on the front side of the lace. There is no missing cap.
Identify the backside by locating a picot. If it does not have a cap, you are looking at the backside.
Join (J): Two elements are connected together, usually by joining the ball thread to a picot of a ring or chain.
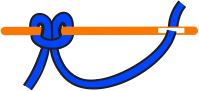
Josephine Ring (JR): (a.k.a. Josephine Knot) This element is made by repeating the first half stitch over and over. Then close the ring by inserting the needle through the loop in the usual manner. This ring may also be made by repeating the second half stitch.
Josephine Spiral (JS): (a.k.a. Josephine Chain) A chain made by repeating the first half stitch of the double stitch or the second half stitch for the full length of the chain. These stitches form a spiral along the needle thread.
Lark’s Head Knot (LHK): This is the basic knot used in tatting. Also, it is called the double stitch.
Lock Stitch (LS): First half stitch of the DS is made as usual. Pinch this half stitch and pull needle through while sliding the half stitch off of the needle. Continue holding this half stitch while making the second half. Then the second half of a lock stitch is made with the shoe lace trick used to close a ring or a chain. This creates a small knot.
Mignonette: The rows are connected by Josephine Rings. After making the first ring in the normal manner (using the ball thread), all subsequent rings are made with only the needle thread.
Bare thread spaces (BTS) are kept uniform by measuring each one with a folded picot gauge. To make a folded picot gauge, cut out a gauge from paper as thick as an old manila folder or use an old business card. If you want a ¼” bare thread space, cut the gauge ¼” x 5”. Then fold over the thinner edge of the gauge. When you want to measure a bare thread space, hang the folded gauge over the thread like a clothespin hangs on a clothesline. Use your fingernail to make an indentation in your thread to mark where the gauge ends. Remove the gauge and make your next ring, allowing the first double stitch to rest in that indentation.
Mock Picot (MP): A mock picot is used to move from one round or row to another. It is made after closing a split ring or split chain. Leave a bare thread space of both the ball and needle thread. The bare thread space should equal the size of the other picots in the pattern.
Needle Thread (NT): (a.k.a. core thread, running thread, foundation thread) Thread goes through eye of needle and lies before first double stitch.
Picot (P): Picots may serve two functions: decorative or to join two elements.
A picot is made by making a double stitch, leaving a bare thread space, and making another DS. Slide the two doubles stitches next to each other. The bare thread space will form a picot.
Picot Gauge: This tool is used to make uniform sized picots. Gauges may be made from wood, quilter’s template plastic, metal, or even recycled file folders. Common measurements for a picot gauges are: ⅛″, ¼″, ½″, ¾″ and 1″. Or gauges are available at a tatting supply store.
After a double stitch the gauge is placed against the needle and the needle thread is brought around the front of the gauge. This makes a picot gauge sandwich of needle thread, picot gauge, and needle. Make another double stitch against the edge of the picot gauge. Remove the gauge and slide the new double stitch next to the previous double stitch. The bare thread space converts in to a picot.
Pinch: A pinch is formed when the index finger is flattened on top of the thumb. The pinch can be used to prevent double stitches from shifting along the core thread. This may happen when using a picot gauge. Covering each newly made stitch helps keep your caps lined up in a neat little row.
Reverse Work (RW): This means to turn work to its opposite side using an up or down motion similar to opening or closing an oven door.
Ring (R): Double stitches form a circle. A ring is made the same as a chain except that the needle is inserted through the loop before the ring is closed.
Reverse Order of Double Stitches (RODS): Reverse the normal order of making the double stitch. Traditionally, the first half stitch is made, then the second half stitch (clockwise wrap, then counterclockwise wrap) to form one double stitch.
To reverse the order: make the second half stitch, then the first half stitch (counterclockwise wrap, then clockwise wrap).
Rotate Work (Rtt): Turn your work like a bicycle wheel rotates, except you can go in a counterclockwise as well as clockwise direction. Do not turn work to its opposite side.
Round of tatting (Rnd): Lace is worked in a pattern of concentric circles. The first round creates a center circle. The second round surrounds the center circle and so on.
Row of tatting (Row): Lace is worked in rows or a linear pattern. This is similar to how a qwerty keyboard is laid out. When using only the letters of the alphabet, the first row starts at “q” you move across the row to “p”. The second row starts at “l” and ends at “a”, the third row starts at “z” and ends at “m,” and so on.
Second Half Stitch (2HS): This is the second leg of a double stitch. Wrap ball thread in a counterclockwise direction to make this stitch. Lift off of your index finger in the usual way.
Shoelace Trick (SLT): It is used to close rings and chains.
The shoelace trick uses the same first motion used when tying your shoelaces. Cross needle thread over the ball thread by turning your work to its opposite side. An almond shape forms. With needle thread on top of the ball thread, insert needle under the ball thread, through the center of the almond, then over the needle thread. Tighten this half knot.
Split Chain (S/Ch): This technique requires several movements. Make the first half of the chain in the normal manner. Then unthread the needle. Rotate the needle 180° to make the double stitch(es) with the needle thread. These double stitches hang on the end with the eye of the needle. Rotate the needle back to its original position. Rethread your needle. Pull the needle thread through the double stitches and close as normal.
Split Ring (S/R): The same technique is used for a split ring as for a split chain. (See split chain above.)
Square Knot (SqK): This knot is made with the same motion used in beginning to tie your shoe lace. Begin with needle thread in your right hand and the ball thread in your left hand. Cross needle thread over and under the ball thread. Pull threads in opposite directions to tighten this knot. Then cross ball thread over and under the needle thread. Pull threads in opposite directions to tighten the knot. (See video on Reference page.)
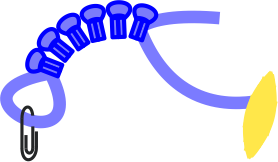
Starter Picot: Before making your first double stitch, place a paper clip on the loop area of the needle thread. Then make your first ring or chain. When you close your ring (or chain), the paper clip will snug up to your completed double stitches and reserve a portion of the loop. Continue tatting per pattern instructions. When it is time to join your tatting, remove the paper clip. The loop has created a small picot space left by the paper clip. This picot space is used for a join.

Turn Work (TW): Turn work to its opposite side as if turning over a page in a book.
Very Small Picot (VSP): The purpose of a small joining picot is to stabilize elements of a motif. The hole in this picot should be no larger than the circumference of the thread you are using. (e.g., for size 10 thread, use approximately 1/8˝ picot). This eliminates the empty picot space left over from a normal join. If the is too much empty space, the motif will be floppy.
Also, when the join is completed, because there is no empty space between the thread going through the center of the picot and the picot itself, this absence of space makes the join much less visible and very stable.
Adding Threads: Add threads whenever you run out of thread or need to cut out a mistake. There are several methods to add thread to rings and chains: cut and tie, a weaver’s knot, using beading wire as a loop to pull through tails, and tatting over tails. My favorite method is to use Soft Touch (very fine) beading thread. Cut off a length of beading thread. Tie or use a small piece of duct tape to join the ends together. This makes a loop. Weave the loop in the new stitches, then pull the old tails through the new stitches. (See Magic Thread Trick for a more detailed description.)
Active Shuttle (AS): It is the shuttle used to make the under and over motions which creates a double stitch. The passive shuttle is the one that holds the ball thread.
Ball Thread (BT): Thread originating from the ball of thread.
Bare Thread Space (BTS): The core thread has an unworked section of thread. For example, 1/4″ of BTS occurs when there are no double stitches covering the 1/4″ of the core thread. Bare thread spaces are used in mignonette (see below), half-closed rings, and for other decorative purposes.
Bead (B): Beads are often added at the point where picots would have appeared.
Using a shuttle, add a bead to a ring.
Beads are placed on the shuttle before tying the ball and shuttle threads together to begin tatting.
Before starting to tat, bring the required number of beads onto the thread. Beads should be placed behind the middle finger to hold them out of the way while making the double stitches. Finish bring the thread into a circle and to the pinch. The beads are ready to take the place where a picot would have appeared. Tat to the place on the ring where a bead needs to appear. Release your middle finger and bring a bead to the place where a picot normally appears. Snug it up against the doubles stitches. Hold the bead in the pinch while making a new DS. Snug up new DS against bead. When you are finished placing all of the beads for your pattern, close the ring.
Using a shuttle, add a bead to a chain.
Place required number of beads on ball thread. Tat to the point where a bead is required. Where a normal picot would occur, instead bring up a bead from ball thread. Tat a double stitch after placing the bead.
Blade: There are two blades on a shuttle. They are the canoe shaped parts on either side of the center block. Blades can be made of tortoise shell, mother of pearl, plastic, metal, ivory, wood, and bone.
Blocking: After tatting your article, make sure it is flat and clean. Wash the tatted article in a mild soap and warm water. If your water supply has an abundance of minerals, use distilled water. Then, with rust-proof pins, pin lace out on a pinning board. I like to use T-pins to open up the picots.
Cap: A cap is the bump above the legs of a double stitch. It is an easy term to remember as most people wear a cap on their head which is above their legs.
Chain (Ch): A chain is made with two threads: a ball thread and a shuttle thread. The shuttle moves under or over the ball thread. This causes the ball thread to flip and create a double stitch. The double stitch is suspended upon the shuttle thread.
To make a chain, tie two threads together with a square knot. Hold this knot between your left index finger and thumb. Wrap the ball thread over your middle and ring finger, then under your pinky finger. Wind thread a couple of times around your pinky to secure. Hold ball thread taut. Hold the shuttle in the right hand. Use the shuttle to make the under and over motions to form a double stitch. (If left-handed, perform these movements with the opposite hands.)
Clover: Clovers are composed of three consecutive rings grouped together. The center ring may be larger than the side rings. This is similar to a trefoil. However, the rings in a trefoil are uniform in size.
Continuous Thread Method (CTM): Most often this refers to a strategy to move from one element (such as a ring or a chain) to the next without cutting and tying threads. Split rings, split rings, and mock picots are common CTM techniques. Also, this technique is known as the knotless method. The thread from the ball is continuously wound on to the shuttle without cutting the thread.
Core Thread: a.k.a. foundation thread, shuttle thread, or running thread. Traditionally, the shuttle thread is used as the core thread. It used like a clothesline upon which the double stitch hangs.

Double Stitch (DS): This stitch is the basis of tatting. Actually, a DS is a Lark’s head knot.
The shuttle moves under the ball thread, then over the ball thread to make the first half stitch of the double stitch. This movement causes the ball thread to flip up. Then the shuttle moves over and under the ball thread to form the second half stitch of the double stitch. Again, causing the ball thread to flip up. The second half stitch is a mirror image of the first half stitch. These two half stitches make one double stitch.
First Half Stitch (1HS): This is the first leg of a double stitch. The shuttle moves under, then over the ball thread.
Front side/backside: Each double stitch has a cap. In front side tatting, all of the caps can be seen on the front side of the lace. There is no missing cap.
Identify the backside by locating a picot. If it does not have a cap, you are looking at the backside.
Half Stitch (HS): Two half stitches make up one double stitch. The first half stitch (1HS) is made by moving the shuttle under, then over the ball thread. This causes the ball thread to flip up. The second half stitch (2HS) is made by moving the shuttle over, then under the ball thread. Again, this causes the ball thread to flip up.
Join (J): The most commonly used joins are the up-join, the down join, and the lock join. A join unites two elements (like a ring or chain) via a picot.

Up Join: Assume you are make a ring while the front side faces you:
The shuttle thread is held beneath the picot. With a crochet hook, pull the shuttle thread up through the picot (backside to front). Continue pulling on the hook until a large loop is formed (see Diagram A). Insert shuttle (backside to front side) up through loop. Pull on ring thread to snug up the loop against the picot. Continue tatting double stitches.
When using variegated thread or when the ball thread is one color and the shuttle thread is a different color, a color blip (contrasting color) can be seen in the join. An up join will cover the blip on the front side of the work (see Diagram B). However, it can still be seen on the backside of work.
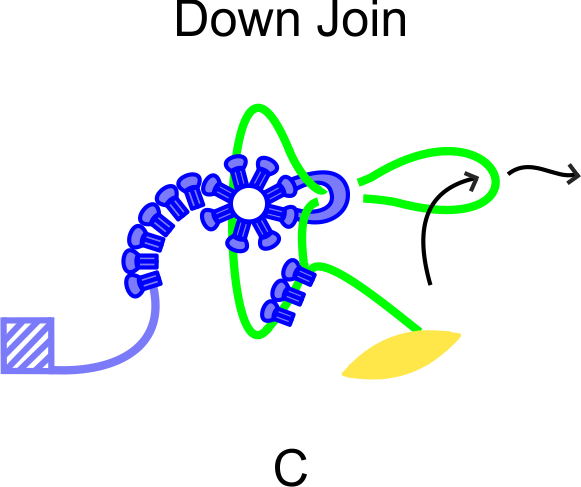
Down join: Assume you make a ring while the backside faces you:
The shuttle thread is laid across the top of the picot (picot is beneath shuttle thread). With crochet hook, pull shuttle thread down through picot (backside to front side). Continue pulling on hook until a large loop is formed (See Diagram C). Insert shuttle (backside to front side) down through loop. Pull on ring thread to snug the loop against the picot. Continue tatting double stitches.
When using variegated thread or when the ball thread is one color and the shuttle thread is a different color, a color blip (contrasting color) can be seen in the join. An down join will cover the blip on the front side of the work (see Diagram B–up join). However, it can still be seen on the backside of work.

Lock Join: This is used to join a chain to a picot which allows you to change direction. Also, it holds the previous stitches in place (i.e., the stitches previous to the join will not be able to shift). Sometimes this is called the shuttle join.
Insert hook down through picot. Pull up shuttle thread through picot to form a loop. Insert shuttle up through loop. (See Diagram A.)
To eliminate the bare thread (shown in pink) between previous stitches and the join, pull on the shuttle thread. (See Diagram B.)
Josephine Ring (JR): a.k.a. Josephine Knot. Make the ring in the usual way, except use only one-half of the double stitch (either 1HS or 2HS) to create a ring. When you make a ring by repeating only the 2HS, then before closing your ring, insert the active shuttle inside of the loop. This helps your ring lay completely flat. If the particular thread you are using does not lay flat, then try starting the JR with one double stitch before repeating the 2HS to complete the ring. The above steps are not necessary when you use the 1HS to make a JR.
Josephine Spiral (JS): a.k.a. Josephine Chain. A chain made up by repeating only one-half of the double stitch (either the 1HS or 2HS) for the full length of the chain. This tatting forms a spiral along the core thread.
Lark’s Head Knot (LHK): The LHK is also called the double stitch. This is the basic knot used in tatting.
Lock Stitch (LS): First half stitch of the DS is not flipped. The second half stitch of the DS is flipped.
Magic Thread Trick (MTT): This technique is used to hide the tail ends of thread inside of a ring or chain. Soft Touch (Very Fine) beading thread (b-thread) works well for this task. Cut and thread a 6″ piece of b-thread through the bottom coil of a tiny safety pin. Tie the b-thread ends together. (Or tie two ends of the b-thread together to form a loop without a safety pin.) Make two of these loops.
When you are nearly finished with your motif, and there are two elements left to tat (e.g., a ring and chain), you can use the MTT. When the front side faces you and you are about to make your last ring: make the first half stitch, but do not tighten. Insert the loop (safety pin side first) through open area of untightened stitch. Safety pin is inserted in front side to backside direction. Tighten first half stitch. (The safety pin side will dangle, the tightened stitch holds the center of the loop, the open b-thread loop is left to dangle outside of the stitch.)
Make the second half stitch, but do not tighten. Insert the b-thread loop (from the backside to the front side) through the open area of untightened half stitch. Safety pin is inserted from front side to backside direction. Tighten second half stitch. Continue weaving the loop in this manner for four to six stitches.
Continue to let the b-thread loop dangle until you have closed your ring. Then insert one thread tail (either ball or shuttle thread tail) through the b-thread’s loop. Pinch the safety pin and pull b-thread through the double stitches. The tail will be pulled through the double stitches and hidden in the work. Cut off the extra length of thread tail.
In the next element (e.g., a chain), repeat the above. This time insert the second thread tail (ball or shuttle thread tail) through the loop.
Note: If you tat too tightly over the b-thread, it will be difficult to pull through the thread tails.
Mignonette Stitch: Use only one shuttle to create a net or mesh. Bare thread spaces (BTS) are kept uniform by measuring each one with a folded picot gauge. To make a folded picot gauge, cut out a gauge from paper as thick as an old manila folder or use an old business card. If you want a ¼” bare thread space, cut the gauge ¼” x 5”. Then fold over the top of the gauge. When you want to measure a bare thread space, hang the folded gauge over the thread like a clothespin on a clothesline. Use your fingernail to make an indentation in the thread. Remove the gauge and make your next ring, allowing the first half of the double stitch to rest in that indentation.
Mock Picot (MP): A mock picot is used to move from one round or row to another. It can be found in a split ring or split chain.
For example, two rounds joined with split rings and a mock picot:
With shuttle 1, tat the first part of a split ring as normal with flipped stitches. With shuttle 2, tat the second half of the split ring with unflipped stitches.
Before tatting the first half of the conjoining split ring with shuttle 1, leave a bare thread space the same size as the other picots in the pattern. Do the same with shuttle 2 for the second half of the split ring.
A second way to make a mock picot:
Make your first split ring. Then allow a small bare thread space with shuttle 1 and 2, then make a lock stitch. Then make your second split ring for the new round or row.
Open a Closed Ring: This technique is used to correct a mistake. There are several ways to open a closed ring.
My preferred method is to pick out the last tatted DS. Then, at the picots, gently pull apart the double stitches. Use a crochet hook to pull up on the exposed core thread. Hold the double stitches prior to the picot in a flat pinch. This prevents them from getting too tight when you pull on the core thread. Continue alternating between pulling up the core thread and separating the double stitches until you have a large enough loop to pick out the offending stitches and replace them with normal DS.
Over Stitch (OS): The second half of the Double Stitch. Shuttle thread goes over the ball thread.
Picot (P): Picots may serve two functions: decorative or used to join two elements.
A picot is made by making a double stitch, leaving a bare thread space, and making another double stitch. Slide the two doubles stitches next to each other. The bare thread space will form a picot.
Picot Gauge: This tool is used to ensure uniform size of the picots. Picot gauges can be homemade out of stiff cardboard, quilter’s template plastic, plastic from milk cartons, the back of a school spiral notebook, or manila folders. Also, they can be made out of wood or metal. Or they are available at a tatting supply store. Common measurements for a picot gauge are ⅛″, ¼”, ½”, ¾” and 1″.
According to Georgia Seitz, you can measure picots in two ways: vertical or horizontal.
Vertical: Gauge should be at a vertical 90° angle in relation to the ball thread. At the point where you want to make a picot, place gauge against the ball thread and next to the last double stitch. Bring the shuttle thread across the front of the gauge. Pinch threads and gauge to make a little sandwich with the picot gauge between the ball and shuttle thread. Make a new double stitch, then remove the gauge. Slide the new double stitch up against the old double stitch to form a picot. In this method, picots are made one at a time as the gauge is removed after each measured picot.
Horizontal: The picot gauge is held in a horizontal position on top of the completed stitches. The shuttle thread is lifted up, over, and behind the gauge to make a picot. The wrapping of the thread around the picot gauge is similar to how a burrito is wrapped. Pinch the last double stitch, ball thread, gauge, and shuttle thread. Make the new DS snug against the gauge. Do not remove the gauge. Continue to normally tat until it is time to make the next picot. Again, lift the shuttle thread up, over, and behind the gauge. The horizontal position allows for several picots to be made in a row. When the ring or chain is ready to be closed, then remove the gauge. This creates multiple picots of uniform size.
Pinch: A pinch is formed when the index finger is flattened on top of the thumb. The pinch can be used for several reasons including: to prevent double stitches from shifting along the core thread; to hold a picot gauge or a bead in place. Covering each newly made stitch with a pinch helps keep your caps lined up in a neat little row.
Reverse Work (RW): This means to turn work to its opposite side using an up or down motion similar to opening or closing an oven door.
Ring (R): This is a circle of double stitches. Rings are made with one thread─the active shuttle thread. The active shuttle thread is wound around the left hand and held in a pinch. Then this thread is used as the core thread but will turn into the ball thread when the stitches are flipped. Pull on the shuttle to close the ring.
Reverse Order of Double Stitches (RODS): Reverse the normal order of making the double stitch. Traditionally, the first half stitch is made, then the second half stitch (1HS, 2HS) to form one double stitch.
To reverse the order: make the second half stitch, then the first half stitch (2HS, 1HS). All of the stitches are flipped as usual.
Rotate Work (Rtt): Turn your work like a bicycle wheel rotates except you can go in a counterclockwise as well as clockwise direction. Do not turn work to its opposite side.
Round of tatting (Rnd): In patterns worked in concentric circles, the first round is the center circle. The second round surrounds the center circle and so on.
Row of tatting (Row): Lace is worked in rows or a linear pattern. This is similar to how a Qwerty keyboard is laid out. When using only the letters of the alphabet, the first row starts at “q” you move across the row to “p”. The second row starts at “l” and ends at “a”, the third row starts at “z” and ends at “m,” and so on.
Second Half Stitch (2HS): The shuttle moves over, then under the ball thread.
Self-Closing Mock Ring (SCMR): This uses a chain to create a ring.
Use two shuttles: Shuttle 1 (S1) is the active shuttle and core thread. Shuttle 2 (S2) is the ball thread. Hold the ball thread the usual way to make a chain. Before beginning to tat with S1, press your middle finger down to pull out a length of S1 core thread. The shuttle thread will make a loop. Pinch this length of thread and the ball thread at the same time. Tat a chain as normal. When you are finished, insert S1 (active shuttle) through the loop initially made by pressing down your middle finger. Pull shuttle thread to close the mock ring.
Shoelace Trick (SLT): If you are running out of thread on one shuttle, but have enough thread on a second shuttle. You can perform the Shoelace Trick by making the first motion used to tie your shoelace: cross shuttle 1 thread over shuttle 2 thread and bring it under shuttle 2 thread. Insert the shuttle between where shuttle 1 and shuttle 2 threads crossed. Tighten this half knot. Pick up the full shuttle and continue tatting.
Also, this technique is used when you want to change colors. For example, shuttle 1 holds blue thread and shuttle 2 holds yellow thread. Your previous double stitches have been blue and now you want to make yellow double stitches. Switch your shuttles using the shoelace trick.
Split Chain (S/Ch): This technique allows you to continue from round to round or row to row without cutting and tying the threads. The split chain with 5 – 5 double stitches is made in two parts. The first half of the chain (5 double stitches) is made in the normal way. The second half of the split chain is a bit more complicated. The best video I have found for this was made by Marie Smith. It can be found here.
Split Ring (S/R): This technique requires two shuttles. For a ring of 5-5, begin the ring like normal with Shuttle 1. Tat 5 normal DS. Drop shuttle 1.
Turn your hand exposing the core thread on the palm of your hand. (Or spread your fingers apart and place the ring’s core thread around your fingers.) Pick up Shuttle 2. On the core thread, make 5 double stitches in Reverse Order of the Double Stitches. Shuttle 2 stitches are not flipped. Just slide each half stitch next to your previous stitch. Repeat this process until you have 5 double stitches which are not flipped. Take the core thread completely off of your hand. Pinch the last double stitch made by Shuttle 1. Pull on Shuttle 1 thread to close the ring.
Square Knot (SqK): This knot is made with the same motion used in beginning to tie your shoe lace. Begin with thread A in your right hand and thread B in your left hand. Cross your right hand thread (A) over and under the left hand thread (B). Pull to tighten this knot. Then cross the left hand thread (B) over and under the right hand thread (A). Pull thread A and B in opposite directions to tighten the knot. (See video on Reference page.)
Starter Picot: Before making your first double stitch, place a paper clip on the loop area of the core thread. Then make the first double stitch and snug it up next to the paper clip. Continue tatting per pattern instructions. When it is time to join your tatting, remove the paper clip. There will be a small picot space left by the paper clip to use for a join.
Switch Shuttles (SS): Put down the current shuttle you are using. Pick up the second shuttle. You have just switched shuttles.
Tat Over Tails (TOT): This technique can be used to hide, or encapsulate tail ends of thread.
When you start to tat, tie the ball and shuttle threads together. When making the first half stitch (e.g., for a ring), use a crochet hook to pull down a tail end, from front side to backside, through the flipped loop. When making the second half stitch, use a crochet hook to pull up the tail end, from backside to front side, through the flipped loop. The encapsulated tail end follows the Core Thread. Continue this for four to six stitches. Clip off the extra length of tail end which is not hidden. Continue tatting.
After you have finished tatting a ring, let’s say you begin to tat a chain. Pick up the second tail end and weave it in the double stitches as outlined above. Trim off tail and continue tatting.
Turn Work (TW): Turn your work to its opposite side like you would turn a page in a book.
Under Stitch (US): First half of the double stitch.
Very Small Picot (VSP): The purpose of a small picot is to stabilize and join elements (e.g., ring, chain, etc.) of a motif. The hole in this picot should be no larger than the circumference of the thread you are using. (e.g., for size 10 thread, use approximately 1/8˝ picot). This eliminates the empty picot space left over from a normal join. If the is too much empty space, the motif will be floppy.
Also, when the join is completed, because there is no empty space between the thread going through the center of the picot and the picot itself, this absence of space makes the join much less visible and very stable.