BASICS
Identify Thread Sections
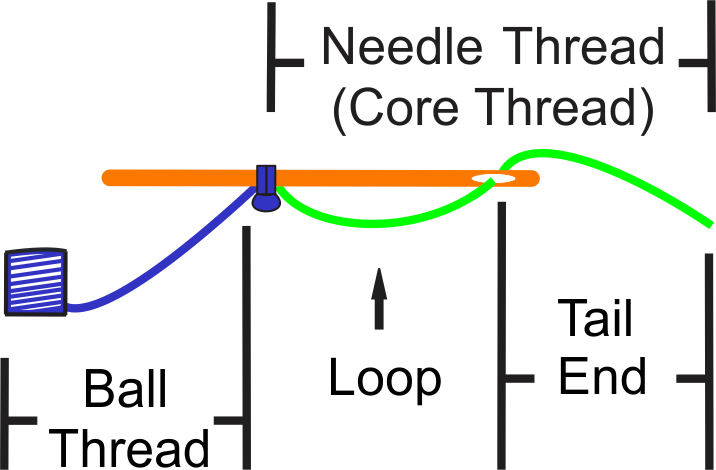
To make it easier to see, yarn is substituted for crochet or tatting thread in the following videos.
MAKE A DOUBLE STITCH
MAKE A RING AND PICOT
MAKE A CHAIN
MAKE A JOIN
There are a number of ways to finish your tatting. You don’t have to use only starch. Here are some alternatives (which include a homemade recipe for starch).
No Starch, just sew method:
If you are sewing your tatted piece onto a quilt, then you do not need to starch it, especially if you use high quality thread which holds a picot’s shape. However, use starch when picots are slightly twisted, picots are closed, or your motif doesn’t lay flat. (Remember to spray starch in a ventilated area and do not spray into the wind.)
If you want your picots to be rounded, then you push your T–pin through the picot loop at about a 10° angle. (Or as flat as you can get the pin to lay against the pinning board.)

If you want your picots to be pointed, then place your pin at a 90° vertical angle inside the picot loop and pull in a horizontal motion. Then insert the pin into the pinning board. You might want to use the thinner sewing pins as these will produce a sharper point.

Elmer’s Glue:
Dilute the glue with enough water to produce a runny consistency like milk. It should flow easily over the tatted article. I use distilled water. Approximate measurements are 1 tablespoon Elmer’s Glue with 2 tablespoons of distilled water. Submerge your tatting in the glue. Pull out and dab off excess glue mixture with a tissue.
Pin your tatted article to waxed paper. (See Tips Section of this Newsletter.) Use tissue to soak up extra glue mixture. Waxed paper prevents your tatting from sticking to the surface as it drys.
Sugar and Water:
Use a one to one ratio of sugar and water. On the stove, melt the sugar and water mixture in a pan. Continue stirring until the mixture is clear. (Sugar will invert.) Let mixture cool until it is warm. Submerge your tatting in mixture. Be sure to use the mixture while it is warm. Otherwise, your thread tends to unevenly soak up the mixture which will result in an uneven color.
Acrylic Spray:
A can of acrylic spray is found in most craft stores. This is used for tatted jewelry because it really hardens the thread. Spray tatted article in a well ventilated area. Spray both sides of jewelry. Wipe off excess spray on the beads so it doesn’t diminish the colors. Pin out on waxed paper. Or if it is a novelty item, place it on the appropriate form like a key ring or brooch. Let dry.
Store bought Spray Starch:
Use heavy spray starch for articles that need to be very stiff. Use light spray starch for tatting that needs to bend a little for drape like curtains. Light starch adds a little body to the tatting.
Homemade Starch:
Stir ¼ cup cornstarch in to one cup of tepid water until it is dissolved.
Add this mixture to a quart of water in a pan.
Place pan on burner. Stir this mixture until it comes to boil.
Heavy Starch: Use above recipe. Make sure it has cooled down to a warm temperature.
Medium Starch: Add 1 quart of cold water and stir.
Light Starch: Add 2 quarts of cold water and stir.
Note: Avoid using starch on items which are meant to be handed down generation to generation, i.e. a tablecloth. Eventually, starch will deteriorate the thread.
How to Make a Picot Gauge
by Laura Evans
Picot gauges can be made of various materials:
- old file folder
- quilter’s template plastic
- back of spiral notebook
- heavy poster board
Step 1: Cut a 1″ x 4″ section of your chosen material.
Step 2: Use a ruler to:
- A: Draw a 1/4″ x 1″ line
- B: Draw a 1/2″ x 3/4″ line
- C: Draw a 1/4″ x 1/2″ line
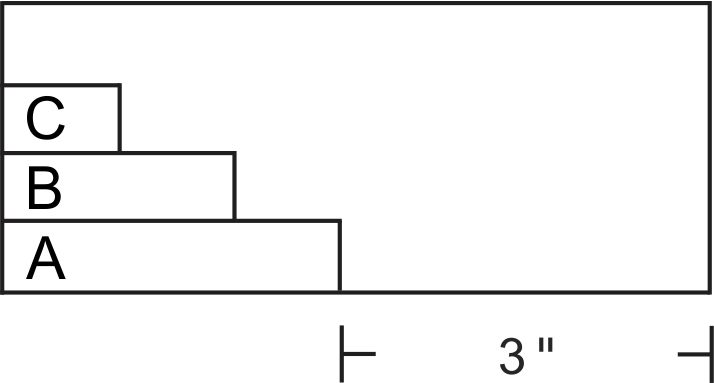
Step 3: Use scissors or x-acto knife to cut along the dotted lines.
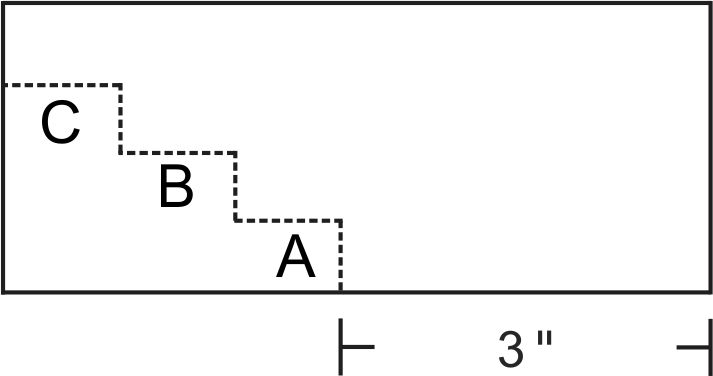
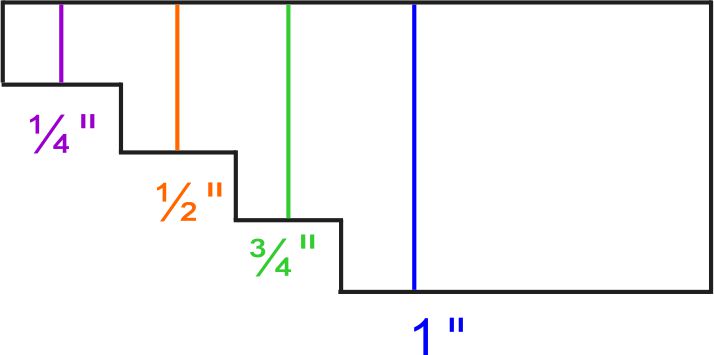
Finished Picot Gauge: You can measure a 1/4″ picot, 1/2″ picot, 3/4″ picot, or 1″ picot.
As a newbie tatter, I was confused about whether or not to count a picot (p) as a double stitch (ds). I hope this article will help clarify the matter.
In most patterns:
a joined picot means you do not count the picot as one double stitch.
And an unjoined picot is counted as one double stitch.

Joined Picot
In the above example, the joined picot is indicated in green. In small patterns, the joined picot is not counted as one double stitch.
Exception:
In large patterns, often a joined picot is counted as one double stitch.
Why? When you join a picot you use one thread. The thickness of one thread is not significant in a motif with five joined picots. However, if you have 25 joined picots, each using one thread, then that large amount of thread has to be accounted for.
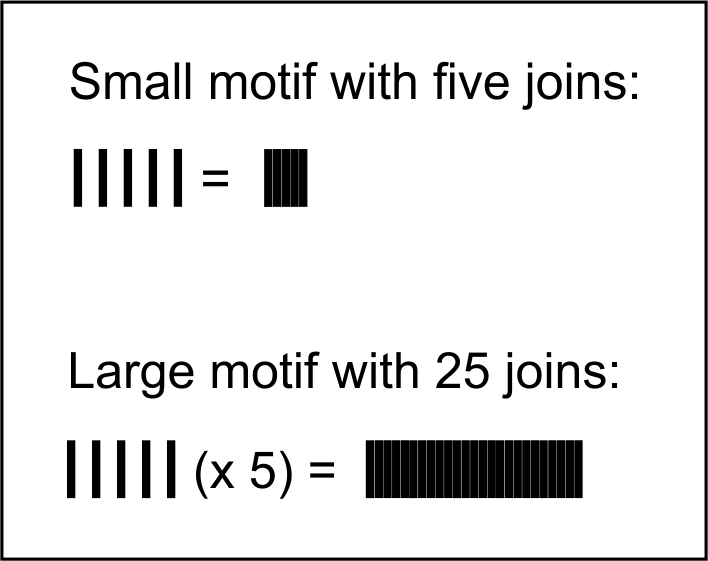
Back to the example:
A joined picot = do not count picot.
The above statement put in a mathematical equation means that the joined picot counts as zero. Look at the numeral listed after the joined picot and before “ds” in the above example. (Example = “6”)

Add that numeral to zero for the total number of double stitches: (6 + 0 = 6).
Unjoined Picot
All unjoined picots are counted as one double stitch.
How to figure out the number of doubles stitches to count in the above example with regard to the last unjoined picot (counted as one double stitch) is as follows:
Look at the numeral listed after the last unjoined picot and before the “ds”.

In a mathematical equation you may deal with this using Addition or Subtraction.
- Counting an unjoined picot using Addition:
Identify the numeral listed in front of DS and after last joined picot: (example = “3”). The last unjoined picot before the listed numeral counts as “1”. As you continue tatting, each new DS is counted as “1”. In other words, add “1” to the unjoined picot (counted as 1) every time you make a new DS. Continue making a new double stitch until the total amount of DS equals the numeral listed, (e.g., 1 (unjoined picot) + 1 + 1 = 3 ds).
- Counting an unjoined picot using Subtraction:
Identify the numeral listed in front of the DS and after last unjoined picot, (example = 3 ds). Subtract “1” from listed numeral, (e.g., 3 – 1 (unjoined picot) = 2 ds).
Summary
An unjoined picot is always counted as “1” double stitch. How that “1” is treated depends on which operation you choose: additional or subtraction.
Starter Picot
When your pattern begins with a chain, you can use a starter picot.
You will need a paper clip.
- Make the required number of double stitches per pattern instructions.
- Place paper clip on loop.
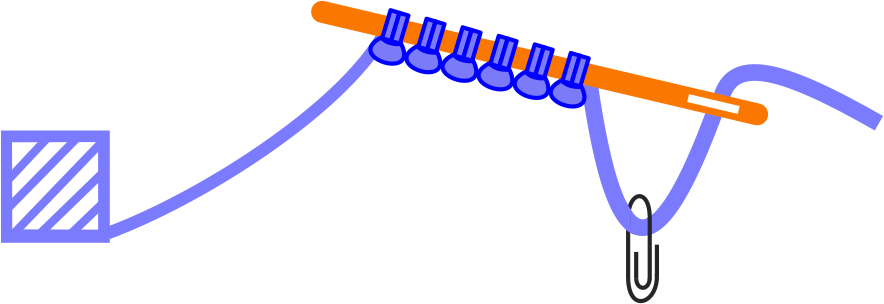
3. Pull needle thread through double stitches as usual.
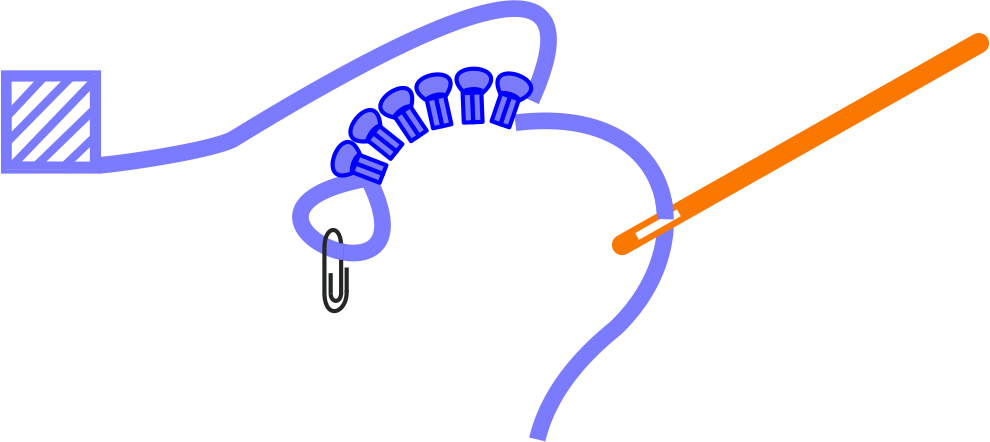
4. Snug up thread around paper clip, but do not remove it.

5. Close chain as usual. And continue following pattern instructions. When it is time to make
the join to the chain, remove the paper clip. A small picot is left. Join to this picot.

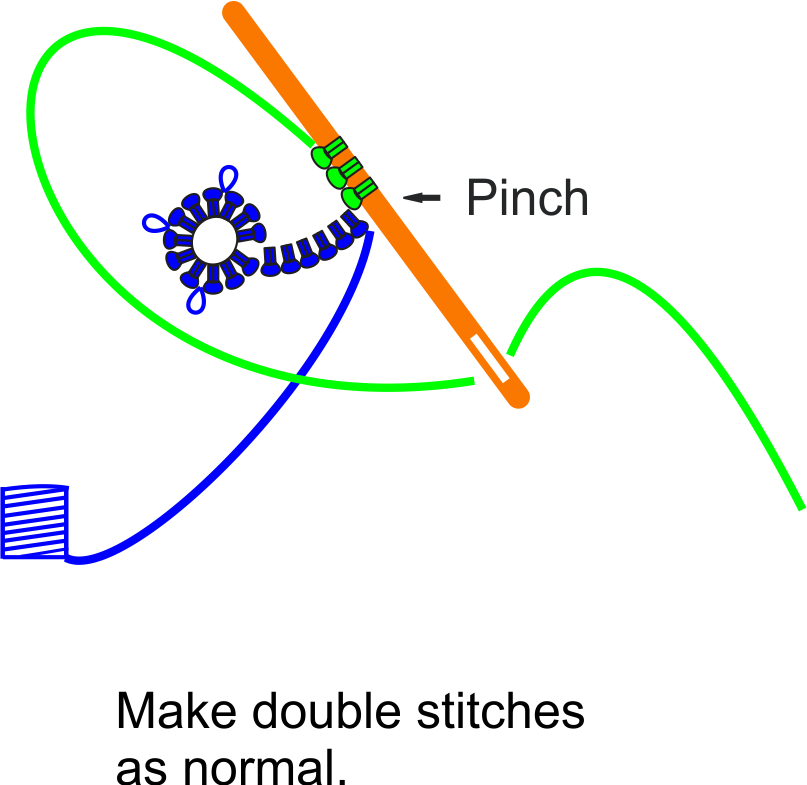
Ring Made with Needle Thread


Videos
Permission given by Ellie Jones.
Slip Knot:
Square Knot:
Permissions:
Forrest Trenaman has given his permission to post the slip knot and square knot video on this site.
Tassel for a Bookmark
This is a video on how to make a tassel.
Needlework Tips for Making a Card
Fabric:
The color of your fabric for a card should be plain. It may have tiny printed motifs on it, but not noticeable. This makes the fabric appear like a solid color which shows off your tatted motif.
Fusible Web:
There are several weights and manufacturers of fusible web. Double sided fusible web allows you to adhere materials to both sides of the fusible web. Single sided fusing allows you to adhere a fabric only on one side.
For making a fabric card, use double sided, very heavy, fusible web. I like Steam-A-Seam 2.
Glue:
There are many types of glue on the market. When working with fabric, make sure your glue includes “fabric” in its list of appropriate surfaces. If it doesn’t, then over time your motif might work itself loose.
When working with tiny bits of glue, it is easier to use a flat toothpick to pick up a dab of glue and place it on a motif.
Iron:
When the instructions say to “press” something, do not move the iron side to side in a scrubbing motion. Instead, place the iron on the fabric and press down. When you are ready to move to a new place, pick up the iron in a vertical direction rather than sliding it off of the fabric. Then place the iron on a new section of fabric. Pressing is an up and down movement. Ironing is a side-to-side movement.
If you try to iron (push side to side) fabric and fusible web, the fabric moves. Exposed web will melt on your iron. This will make your iron messy.
To prevent this, place a piece of 8″ x 11″ copy paper on top of the fusible web and fabric. Make a sandwich by laying down card, fusible web, and then fabric. Place white paper on top of the sandwich and press. (You may also wish to place paper underneath the sandwich to protect the surface of your ironing board.)
If you do get fusible web on your iron, you can remove it with “Iron Off” or another remover.
Pinning Board:
A pinning board is used to pin out your laces. Pinning boards can be made of styrofoam. Just recycle the styrofoam that come inside boxes shipped through the mail. Or you can use a piece of foam core board found at your craft store. Or even a thick piece of cardboard box. Just lay a piece of waxed paper on top of your board. Pin the four corners of waxed paper. Then lay your tatting on top of the waxed paper. Spray starch onto the tatting according to starch manufacturer’s directions.
Scissors:
Reserve on pair of scissors to be used on only fabric. Cutting other materials with fabric scissors will dull them.
Embroidery scissors are handy because they are small enough that they can cut thread very close to a knot without damaging the knot. Or they can enter a small space and clip off a tiny imperfection.
Reference Section
Craft Ideas
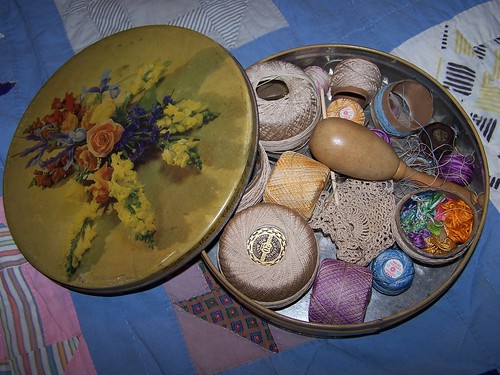
- Julie Frandsen photo (permission given by Julie Frandsen)
Home
- International Organization of Lacers, Inc. Bulletin (Spring 2015, Vol. 35, No. 3) (Book Review)