Tatted Daisy by Mrs. W. M. Odum.

Shared from a post on Pinterest
This pattern has extended instructions for the beginning needle tatter. If you need to find out what a term means: click on “Terms”, choose “Terms for Needle Tatting.”
Supplies
Crochet Thread (Size 10)
Tatting Needle (Size 7)
Crochet Hook (Size 8)
Picot Gauge (1/8″)
Small Scissors
Needle Threader
Abbreviation Key
ds = double stitch(es)
p = picot
Reverse Work: turn motif to its opposite side in a motion similar to opening or closing an oven
door.
Rotate Work: turn work like a bicycle wheel rotates, except you may go in clockwise
or counterclockwise direction. Do not turn motif to its opposite side.
Turn Work: to opposite side as if turning over a page.
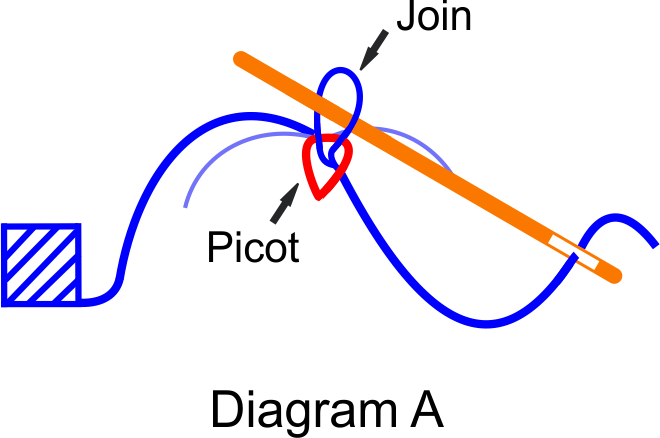
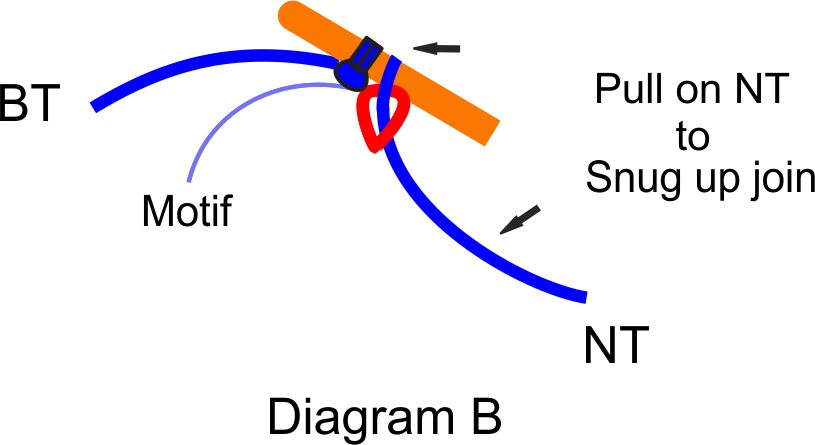
Join
In this pattern “join” means: After the last double stitch of chain is made, do not close. The front side faces you. Insert crochet hook (front side to backside) through picot. Pull up needle thread (NT) from the backside to form a loop. Then insert needle (backside to front) through loop (Diagram A). This is the join. Pull on needle thread to snug up join. Then use the ball thread (BT) to make the required number of double stitches for the next chain (Diagram B).
Preparation

For Round 1: thread 5″ for tail end. Leave 7″ of Loop thread before making the first double stitch.
Round 1

Ring: 2 ds, p, 2 ds, p, 2 ds, p, 2 ds, p, 2 ds, p, 2 ds, p, 2 ds, p, 2 ds. (All 7 picots = 1/8″.)
Leave 4″ before cutting needle and ball threads. Tie in a square knot. (Optional: sew in ends.)
Round 2
Rethread needle as follows:
Thread needle with 44″ for the tail end.
Leave 46″ of Loop thread before making the first double stitch.
First make the join: pull up (back to front side) needle thread through picot to make a loop. Insert needle (back to front side).

Then make the chain according to the following instructions:
*Chain: 4 ds. Do not close. Join to next picot per instructions.*
Repeat from * to * around.
Round 3
*Chain: 6 ds. Do not close. Join to next picot per instructions.*
Repeat from * to * around.
Round 4
*Chain: 8 ds. Do not close. Join to next picot per instructions.*
Repeat from * to * around.
Round 5
In this round you will add a marker after completing the first chain. The marker is a 4″ piece of scrap thread. Tie or drape it over the newly completely chain. Then continue making chains of 10 double stitches all the way around.
*Chain: 10 ds. Do not close. Join to next picot per instructions.*
Repeat from * to * around.
After making the last chain in the current round, remove scrap thread. Make the first chain of the subsequent round. Tie on the marker.
Rounds 6-11
Continue making the chains and joining as usual. Just add 2 stitches to each chain for each additional round. (Hint: Round 6 has 12 double stitches. Round 11 has 22 double stitches.)
Round 12
(Last Round)
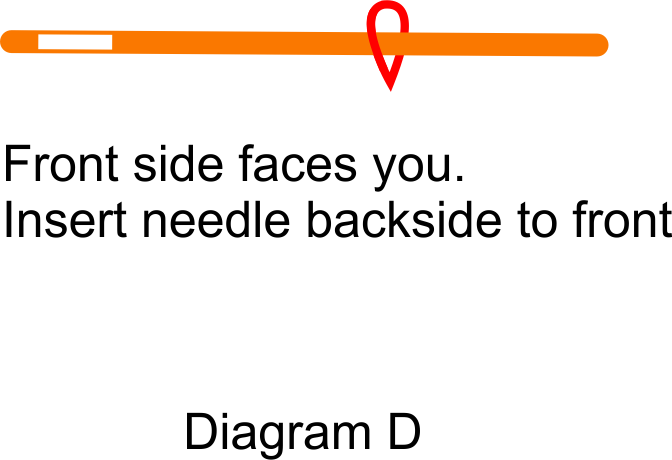
*Chain: Make 20 ds (Diagram C). Insert needle (back to front) through center picot (Diagram D). Do not close. Rotate work.

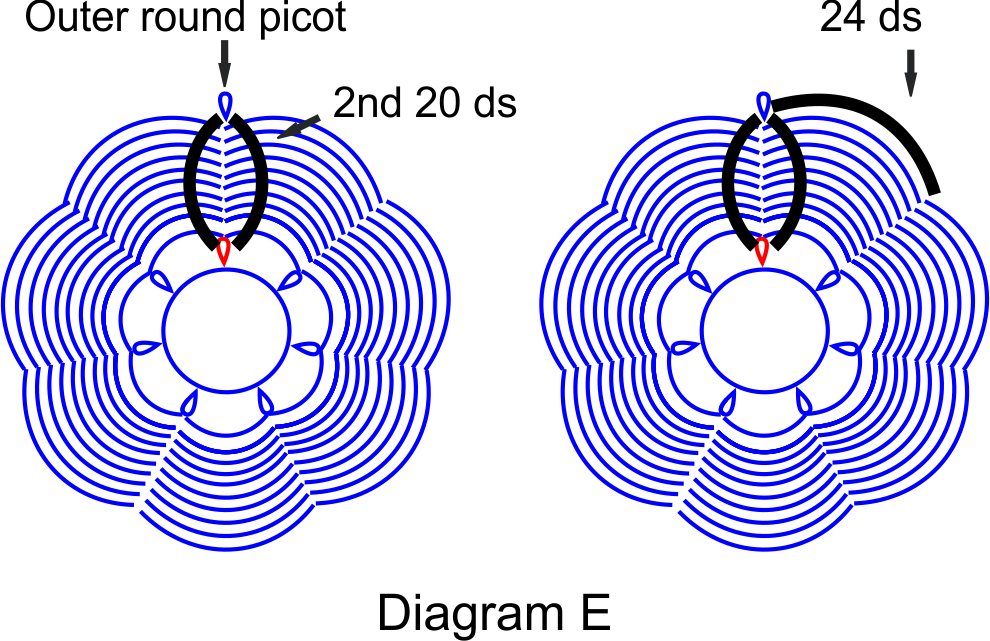
Chain: Make 20 ds. Insert needle (front to back this time) completely through picot on the outer round (Diagram E).
Chain: Make 24 double stitches on the outer round.* Repeat from * to * around.
Join last chain to first picot of the round. Cut and tie in a square knot.